Table of Contents
How to Enable ONVIF
ONVIF (Open Network Video Interface Forum) is a standardised protocol that allows your TetherBox to communicate with Cameras and recorders (DVRs/NVRs) from different manufacturers. Most modern IP Cameras and recorders support ONVIF, but it's often disabled by default.
Your TetherBox can communicate with most Cameras and recorders using the manufacturer's native API. However, if you see a warning icon in the Cameras table, enabling ONVIF provides enhanced functionality:
- Automatic time synchronisation - keeps camera and recorder clocks accurate
- Automatic reboot recovery - restarts Cameras or recorders that stop streaming
- Optimal stream configuration - automatically configures quality settings for best performance
Tip: ONVIF also unlocks advanced features like PTZ control, two-way audio, and access to camera analytics Events.
Step 1: Access Camera Web Interface
Log in to your camera's or recorder's web interface using its IP address. Find the IP address at Admin → Cameras on the TetherX Platform, or check your router's DHCP leases table.
Tip: Use Tunnelling to access camera or recorder configuration remotely without being on-site.
Step 2: Enable ONVIF
Navigate to the ONVIF settings in your camera configuration. The exact location varies by manufacturer, but it's typically under:
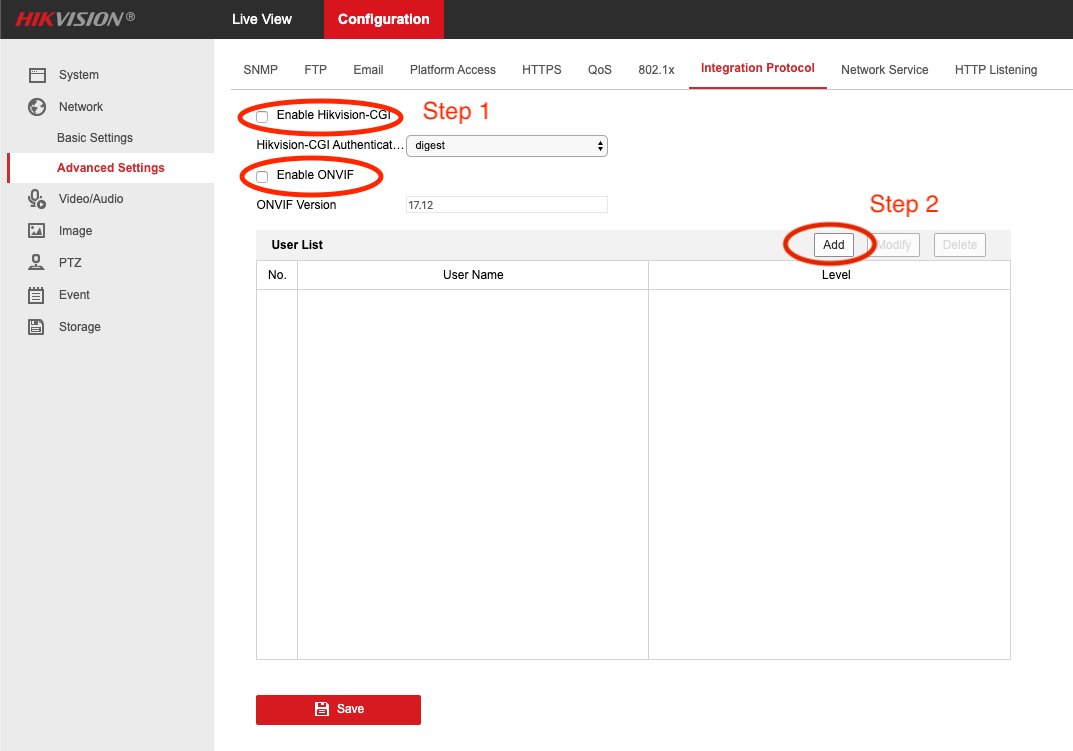
Configuration → Network → Advanced Settings → Integration Protocol
Check the box to Enable ONVIF.
Warning: Some Cameras require a reboot after enabling ONVIF. If the camera doesn't appear immediately, wait 2-3 minutes for it to restart.
Step 3: Create ONVIF User (If Required)
Some Cameras require a dedicated ONVIF user account. If prompted, create a new user with the following settings:
- Click Add or Create User
- Enter a username (e.g.,
onvifortetherbox) - Set a strong password
- Grant Operator or Administrator permissions
- Enable ONVIF access if there's a checkbox
- Click Save or Apply
Tip: Document the ONVIF credentials - your TetherBox will need them for initial connection. After setup, credentials are stored securely on the platform.
Brand-Specific Locations
Hikvision: Configuration → Network → Advanced Settings → Integration Protocol
Dahua: Setup → Network → ONVIF
Axis: Setup → Additional Controller Configuration → ONVIF
Uniview: Network → Protocol → ONVIF
Hanwha (Samsung): Setup → System → ONVIF
Tip: Can't find ONVIF settings? Try searching the camera's web interface for "ONVIF", "Integration Protocol", or "Third-Party Integration".
Troubleshooting
ONVIF option is greyed out:
- Update camera firmware to the latest version
- Some older Cameras don't support ONVIF - check manufacturer specifications
- Certain camera modes (analog compatibility) may disable ONVIF
Camera still not detected after enabling ONVIF:
- Verify ONVIF is enabled and saved
- Reboot the camera manually (power cycle or via web interface)
- Check that the camera and TetherBox are on the same network
- Ensure firewall isn't blocking ONVIF ports (typically port 80 or 8080)
Authentication errors:
- Verify ONVIF user credentials match what's configured on the camera
- Some Cameras require the main admin account, not a separate ONVIF user
- Try resetting camera credentials to defaults and reconfiguring
Referenced in:
- ANPR Whitelist with IP Relay
- Automatic Configuration
- Camera API Tab
- Manual Camera Configuration
- PTZ Cameras Setup Guide
- Setting Up ANPR Cameras
- Valid Camera Stream Paths
- Questions to Ask Your Security System Supplier
- Control Room Software Integration
- Getting Started for Integrators
- Audio Challenge (Push to Talk)
- How TetherBox Detects Devices
- TetherBox Time Synchronisation